If you’re on the hunt for a loaf that’s both comforting and a little bit special, this Sweet Honey Oat Brown Bread Recipe is just what you need. It’s got that perfect harmony of natural honey sweetness, wholesome oats, and a subtle cocoa twist that makes each slice so inviting.

Jump to:
Why You'll Love This Recipe
I honestly can’t get enough of this bread. It’s the kind of loaf I’m excited to pull from the oven on a crisp morning, whether for breakfast or an afternoon snack with a cup of tea.
- Wholesome Ingredients: Combining oat and bread flours for a tender, hearty crumb you’ll feel good about eating.
- Lovely Sweetness: Natural honey creates a gentle sweetness without overpowering the bread’s rich flavor.
- Beautiful Crust: The egg wash topped with oats gives it a stunning, rustic finish that looks as great as it tastes.
- Optional Espresso Boost: Adding espresso powder enhances the cocoa’s depth, taking this loaf from simple to sophisticated.
Ingredients & Why They Work
Before you start, make sure you have quality ingredients on hand. I recommend using fresh yeast and pure honey to really elevate the flavors. Here’s what you’ll be working with and why each piece matters in this loaf:

- Bread Flour: The backbone for structure and chewiness, giving the bread its classic rise and texture.
- Oat Flour: Adds a delicate nuttiness and tender crumb, plus a subtle sweetness all its own.
- Instant Yeast: Quick and reliable fermentation to make your dough rise beautifully without fuss.
- Cocoa Powder: Just a hint brings a mild chocolate base that deepens the bread’s flavor profile.
- Brown Sugar: Enhances sweetness and contributes a little moisture to the dough.
- Salt: Balances sweetness and strengthens the dough’s gluten network for better texture.
- Espresso Powder (optional): A small punch of coffee flavor that amplifies the cocoa without making it taste like coffee.
- Warm Water: Activates the yeast and hydrates the flours for a smooth, workable dough.
- Honey: Natural sweetener that keeps the bread moist and adds flavor complexity.
- Butter (softened): Enriches the dough, lending softness and richness to every bite.
- Egg (for wash): Creates a shiny, golden crust when brushed over the loaf before baking.
- Oats (for topping, optional): Gives texture and rustic charm to the crust.
Make It Your Way
The beautiful thing about this Sweet Honey Oat Brown Bread Recipe is how easy it is to make it your own. By playing around with a few ingredients or textures, you can customize the loaf to fit your taste buds or dietary needs perfectly!
- Espresso Infusion: I love adding the optional teaspoon of espresso powder—it really brings out the depth of the cocoa flavor, creating a subtle, sophisticated nuttiness that pairs wonderfully with the honey’s natural sweetness.
- Oat-Free Version: If oat flour isn’t your thing or you’re avoiding oats due to allergies, simply substitute that with an equal amount of whole wheat flour. It offers a slightly heartier texture but still complements the bread’s mild sweetness.
- Dairy-Free Swap: Butter adds that lovely tender crumb, but for dairy-free bakers, I’ve tried a good quality vegan margarine or plant-based butter – the texture stays soft and the flavor remains delightful!
- Seasonal Twist: Incorporate chopped walnuts or dried cranberries into the dough for an autumn-inspired loaf. It adds a pleasant chew and fruity bursts with every bite.
- Honey Variations: Using different types of honey—like wildflower or buckwheat—can subtly change the sweetness profile and aroma, making each loaf uniquely yours.
Step-by-Step: How I Make Sweet Honey Oat Brown Bread Recipe

Step 1: Gather and Mix the Dry Ingredients
Start by combining the bread flour, oat flour, instant yeast, cocoa powder, brown sugar, salt, and if you’re using it, the espresso powder in a large bowl or your stand mixer’s bowl. Give everything a thorough mix to ensure those dry ingredients are evenly dispersed. This foundation sets the stage for the bread's wonderfully balanced flavor and texture.
Step 2: Add Honey and Warm Water, Then Mix
Pour in the ⅓ cup of honey and the warm water (ideally around 110°F) to the dry mix. Stir until a rough dough forms and all flour is hydrated. Using warm water activates the yeast perfectly without killing it—this little step is crucial for that good rise!
Step 3: Knead to Elastic Perfection
Knead your dough for about 5 minutes until it becomes elastic and smooth. If it feels stiff or dry, don’t hesitate to add an extra tablespoon or two of water incrementally. This is key to achieving a supple dough that bounces back when poked—an excellent indication that your yeast is happy and working hard.
Step 4: Incorporate the Butter
Next, knead in the softened butter for several more minutes. This enriches the dough and gives the bread its tender crumb. The dough at this point should feel soft and pleasant to handle, no longer sticky but perfectly pliable.
Step 5: First Proof — Let the Dough Rise
Transfer your dough to a lightly oiled bowl, turning it to coat all sides with oil so it doesn’t dry out. Cover tightly with plastic wrap or a damp towel and place it in a warm spot for 60 minutes. You'll know it’s ready when it doubles in size and feels airy and puffy.
Step 6: Shape the Loaf
Gently turn the risen dough onto a floured surface. Press it out softly into a rectangle, then roll it up into a tight cylinder shape. This creates those lovely layers that yield a soft yet structured loaf once baked.
Step 7: Prepare and Egg Wash the Loaf
Place the shaped loaf into a greased 8.5”x4.5” loaf pan. In a small bowl, whisk together the egg, honey, and water to make the egg wash. Brush this mixture all over the loaf’s surface, then sprinkle oats on top if you like that rustic, textured look and a bit of extra crunch.
Step 8: Second Proof — Rise Again
Cover the loaf pan again with plastic wrap and let the dough rest for another 60 minutes in a warm spot until it reaches the top of the pan. This second proof is what gives your bread that soft, pillowy final texture.
Step 9: Bake to Golden Perfection
Preheat your oven to 350°F. Bake the bread for about 45 minutes, or until the loaf’s internal temperature hits 190°F. Keep an eye on the crust toward the end — if it browns too quickly, gently tent the loaf with foil to prevent burning while the inside finishes baking.
Step 10: Cool and Enjoy
Once baked, remove the bread from the oven and transfer it to a cooling rack. Let it cool completely before slicing with a serrated knife. This pause ensures the crumb firms up just right, so every slice is tender and moist without being gummy.
Top Tip
Getting the perfect loaf with the Sweet Honey Oat Brown Bread Recipe is all about patience and attention to details. Here are some tips from my own kitchen adventures that will help you bake a truly soft, tender, and flavorful bread every time.
- Perfect Dough Elasticity: When kneading, don’t hesitate to add that extra tablespoon or two of warm water if the dough feels dry or stiff. It makes kneading smoother and gives you a soft, supple dough that rises beautifully.
- Egg Wash Magic: Brushing the loaf with the honey-egg wash before the second proof not only creates a gorgeous golden crust but also helps those oats stick nicely for that inviting rustic look.
- Watch Your Oven: If your crust begins to brown too quickly before the bread is fully baked, lightly tent it with foil. This little trick prevents burning while ensuring the inside is perfectly cooked to 190°F.
- Let It Cool Fully: Patience is key—waiting until the loaf cools completely before slicing avoids a gummy texture and helps the crumb set just right for those perfect slices.
How to Serve Sweet Honey Oat Brown Bread Recipe

Garnishes
This bread is lovely on its own, but you can dress it up to suit any mood. Fresh butter or cream cheese spread on warm slices is divine. For a sweet touch, try a smear of homemade jam, honey, or even a drizzle of maple syrup. If you like a savory balance, a sprinkle of sea salt or a thin slice of sharp cheddar pairs wonderfully. Toast the bread lightly and add smashed avocado plus chili flakes for a trendy, wholesome snack.
Side Dishes
This Sweet Honey Oat Brown Bread shines alongside warm breakfast favorites like scrambled eggs, sautéed greens, or a bowl of creamy oatmeal. For lunch or dinner, serve it with hearty soups—think butternut squash or lentil—or a fresh salad with nuts and cranberries to complement the bread’s natural sweetness and nutty undertones.
Make Ahead and Storage
Storing Leftovers
After baking, store any leftover bread in a sealed bread bag or wrap it tightly in plastic wrap at room temperature. This keeps it fresh and soft for up to 3 to 4 days. Avoid refrigerating as the cooler temperature can dry out the loaf and impact texture.
Freezing
If you want to save your Sweet Honey Oat Brown Bread longer, slice it and freeze the slices in an airtight freezer bag. This way, you can take out only what you need, and the bread stays fresh for up to 3 months. Just thaw slices at room temperature or toast them straight from frozen.
Reheating
To bring back that fresh-from-the-oven warmth, lightly toast slices or warm them in a 350°F oven for about 5 to 7 minutes. This refreshes the crust’s crispness while keeping the inside tender and moist.
Frequently Asked Questions:
Absolutely! The espresso powder is optional and mainly enhances the cocoa flavor for a deeper taste. If you prefer a milder flavor, simply leave it out—the bread will still be delicious.
A slightly sticky dough is normal, especially because of the honey and oats. If it’s unmanageably sticky, sprinkle a little bread flour while kneading until it becomes smooth and elastic. Just be careful not to add too much flour, which can make the bread dense.
Cooling the bread allows the interior crumb to set properly. Slicing too soon might crush the texture and cause a gummy or doughy feel. Patience here rewards you with clean slices and a tender crumb.
Yes, you can use a dairy-free butter alternative to make this recipe lactose-free. Keep in mind this might slightly change the flavor and richness, but the overall texture will remain soft and pleasant.
Final Thoughts
Baking this Sweet Honey Oat Brown Bread Recipe is like wrapping yourself in a warm, cozy hug from the kitchen. The tender crumb, the subtle sweetness from honey, and the comforting nuttiness of oats make it a delightful treat morning or night. Whether you enjoy it fresh from the oven slathered with butter or toasted with your favorite spread, it’s a simple homemade pleasure that nourishes both body and soul. I hope this loaf finds a happy place on your table and becomes a beloved part of your baking repertoire.
Print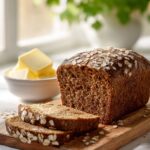
Sweet Honey Oat Brown Bread Recipe
- Prep Time: 15 minutes
- Rest Time: 2 hours
- Cook Time: 45 minutes
- Total Time: 2 hours 45 minutes
- Yield: 1 loaf 1x
- Category: Bread
- Method: Baking
- Cuisine: American
- Diet: Vegetarian
Description
This Sweet Honey Oat Brown Bread combines the wholesome flavors of oat and bread flours with the natural sweetness of honey and a subtle hint of cocoa. The dough is enriched with butter and elevated by an egg wash topped with oats for a beautiful crust. Perfect for breakfast or as a snack, this soft, tender loaf boasts a lightly sweet, mildly nutty profile enhanced by optional espresso powder.
Ingredients
Dough Ingredients
- 370 grams bread flour (about 3 cups)
- 65 grams oat flour (about ⅔ cup)
- 7 grams instant yeast (2 ¼ teaspoons or 1 envelope)
- 1 ½ tablespoons cocoa powder
- 1 tablespoon brown sugar
- 1 ½ teaspoons salt
- 1 teaspoon espresso powder (optional)
- 1 cup warm water (around 110 degrees Fahrenheit)
- ⅓ cup honey
- 3 tablespoons butter, softened
- Additional water (1-2 tablespoons if necessary)
Egg Wash
- 1 large egg
- 1 tablespoon honey
- 1 teaspoon water
- 2 tablespoons oats (optional, for topping)
Instructions
- Combine Dry Ingredients: In a large bowl or stand mixer, add bread flour, oat flour, instant yeast, cocoa powder, brown sugar, salt, and optional espresso powder. Mix until well combined to ensure even distribution of ingredients.
- Add Wet Ingredients: Pour in the honey and warm water and mix until a cohesive dough forms. Ensure all dry flour is hydrated for better dough consistency.
- Knead the Dough: Knead the dough for 5 minutes until elastic and smooth. If the dough feels too stiff or dry, gradually add an additional tablespoon or two of water while kneading to achieve the right texture.
- Incorporate Butter: Add softened butter to the dough and knead for several more minutes until fully incorporated and the dough is soft and supple.
- First Proof: Transfer dough to a lightly oiled bowl, flip to coat all sides lightly in oil, and cover with plastic wrap. Let it rest in a warm place for 60 minutes or until doubled in size.
- Shape the Loaf: Turn the risen dough onto a lightly floured surface. Gently press it into a rectangle and then roll it tightly into a cylinder to shape the loaf.
- Prepare for Second Proof: Place the shaped dough into a greased 8.5”x4.5” loaf pan. In a small bowl, whisk the egg with honey and water to create an egg wash.
- Apply Egg Wash and Oats: Brush the egg wash evenly over the loaf surface and sprinkle oats on top if desired for extra texture and appearance.
- Second Proof: Cover the loaf pan with plastic wrap and let the dough rest in a warm place for another 60 minutes, or until the dough puffs up to the top of the loaf pan.
- Preheat Oven and Bake: Preheat your oven to 350 degrees Fahrenheit. Bake the bread for about 45 minutes or until the internal temperature reaches 190 degrees Fahrenheit. If the crust browns too quickly, lightly cover with foil to prevent burning.
- Cool and Serve: Remove the bread from the oven and transfer it to a cooling rack. Let it cool completely before slicing with a serrated knife to preserve the crumb structure.
- Storage: Store any leftover bread in a sealed bread bag or wrapped tightly in plastic at room temperature for 3 to 4 days to maintain freshness.
Notes
- The optional espresso powder enhances the cocoa flavor and adds depth but can be omitted if preferred.
- If the dough feels dry during kneading, adding water gradually helps achieve the perfect elasticity.
- Butter can be substituted with a dairy-free alternative for a lactose-free version, but it may alter the flavor slightly.
- Use warm water at about 110 degrees Fahrenheit to properly activate the yeast without killing it.
- Allow the bread to cool fully before slicing to avoid gummy texture.
- Storing in a sealed environment at room temperature keeps the bread soft; refrigeration is not recommended as it dries the bread.
Nutrition
- Serving Size: 1 slice (about 60 grams)
- Calories: 160 kcal
- Sugar: 5 g
- Sodium: 210 mg
- Fat: 3.5 g
- Saturated Fat: 2 g
- Unsaturated Fat: 1.5 g
- Trans Fat: 0 g
- Carbohydrates: 28 g
- Fiber: 2 g
- Protein: 4 g
- Cholesterol: 30 mg


Leave a Reply