If you’ve ever dreamed of a dessert that looks stunning and tastes like a slice of heaven, this Red Velvet Cheesecake Recipe is going to become your new go-to. It’s a no-bake delight that perfectly blends that rich red velvet charm with creamy, chocolatey cheesecake bliss.

Jump to:
Why You'll Love This Recipe
Honestly, I fell in love with this recipe the first time I made it. It’s impressive without any of the fuss or stress, and it’s so full of flavor that everyone asks for seconds (and thirds!).
- No baking required: Perfect for hot days or when you just don’t want to turn on the oven.
- Beautiful, vibrant color: That signature red velvet hue makes it a showstopper at any gathering.
- Decadent Oreo crust: Crunchy, chocolatey base adds great texture contrast.
- Rich and creamy filling: Smooth cream cheese mixed with dark chocolate gives you the best of both worlds.
Ingredients & Why They Work
Before we dive into making this masterpiece, let's talk briefly about the ingredients. They’re simple, easy to find, and each plays a key role in creating that perfect texture and flavor balance.

- Oreo cookies: These create that irresistibly crunchy and chocolatey base that’s so satisfying beneath the creamy filling.
- Unsalted butter: Helps bind the crushed Oreos into a firm crust without overpowering the flavors.
- Unflavoured gelatine powder: This is the secret to that set, sliceable cheesecake without baking.
- Heavy/thickened cream: Used both in the filling and whipped topping for luscious creaminess and light texture.
- Cream cheese (softened): The heart of any cheesecake—full fat for that smooth, luxurious feel.
- Caster sugar: Sweetens gently without graininess, blending beautifully into the filling and topping.
- Vanilla extract: Adds warmth and depth of flavor to sweeten and balance everything.
- 70% dark chocolate: Brings rich, intense cocoa notes that perfectly complement the red velvet flavor.
- Red food colouring: For that classic, vibrant red velvet look that wows every time.
- Shaved or grated dark chocolate (optional): Adds extra texture and a touch of elegance on top!
Make It Your Way
One of the best parts about this Red Velvet Cheesecake Recipe is how easy it is to make it your own. Whether you want to lighten it up, add some festive flair, or cater to dietary needs, a few simple tweaks can bring out new flavors and keep this dessert exciting.
- Use a Different Crust: I love the classic Oreo crust here for its crunch and chocolate punch, but Graham cracker crumbs or even crushed digestive biscuits work beautifully if you want a lighter or less chocolatey base.
- Go Dairy-Free: Swap the cream cheese and heavy cream for coconut-based alternatives and use agar powder instead of gelatine. It’s a bit of a fun experiment, but totally doable for a dairy-free red velvet cheesecake treat.
- Add a Berry Twist: Mixing in some fresh raspberries or swirling in a raspberry coulis before chilling adds a tangy brightness that pairs wonderfully with the rich chocolate and cream cheese.
- Seasonal Spices: A pinch of cinnamon or nutmeg in the filling can give your cheesecake a cozy twist that’s perfect for autumn or winter gatherings.
- Decorative Toppings: Beyond the shaved dark chocolate garnish, try fresh strawberries, edible flowers, or even a drizzle of white chocolate to make it look truly show-stopping.
Step-by-Step: How I Make Red Velvet Cheesecake Recipe

Step 1: Prep Your Pan for Easy Cheesecake Removal
First, I invert the base of my 20 cm (8 inch) springform pan so it's upside down. This little trick makes releasing your cheesecake a breeze, avoiding any annoying lip that might tear the edges. I lightly butter the base, press on a square of baking paper, then clip the pan sides back on, letting the extra paper stick out for easy removal later. Don’t forget to butter and line the sides too — this setup means your cheesecake will come out looking perfect every time!
Step 2: Craft the Crunchy Oreo Crust
Next, I crush 200 grams of Oreo cookies into fine crumbs—using a food processor is a time-saver here. Then, I combine them thoroughly with 60 grams of melted unsalted butter to create a rich, chocolatey base. Pressing the mixture firmly and evenly into the prepared pan sets the stage for a perfectly crunchy bottom layer. Into the fridge it goes to chill while you prepare the luscious filling.
Step 3: Bloom That Gelatine and Melt Your Chocolate
Gelatine gives this no-bake cheesecake its wonderfully firm yet creamy texture. Sprinkle 2 teaspoons of unflavoured gelatine powder over 2 tablespoons of water and let it bloom for about 5 minutes. Meanwhile, gently melt 150 grams of 70% dark chocolate—either over a double boiler or in short bursts in the microwave—stirring till smooth. Set the chocolate aside to cool slightly; this keeps it from scrambling your cream cheese mixture.
Step 4: Whip the Cream and Mix the Filling
Whip 1 cup of cold heavy cream using an electric mixer until stiff peaks form. This fluffy cream folds into our filling to make it light and airy. Separately, beat 500 grams of softened cream cheese with ¾ cup caster sugar and 1 teaspoon vanilla extract until silky smooth. Gradually blend in your melted chocolate and six teaspoons of red food colouring until the hue and cocoa richness are just right. Warm the bloomed gelatine gently (no boiling!) until liquid, then whisk it into the cream cheese mixture quickly.
Step 5: Fold It All Together and Assemble
Now comes the delicate part: folding the whipped cream into your chocolate-cream cheese- gelatine mix in batches. This keeps the texture light and velvety—essential for that melt-in-your-mouth feel. Pour the luscious filling over your chilled Oreo crust, smoothing the top with a spatula. Then refrigerate for at least 6 hours, or better yet, overnight. Patience here means perfection—this cheesecake needs that time to firm up just right.
Step 6: Finish with a Creamy Topping and Garnish
Whip 1¼ cups of cold heavy cream with 3 tablespoons caster sugar and 1 teaspoon vanilla extract until soft to medium peaks form—this creates a luxurious topping that balances the rich filling beautifully. Spread or pipe this whipped cream over the set cheesecake. For extra flair, sprinkle 2 tablespoons of shaved or grated dark chocolate across the top. Then, carefully lift your cheesecake out of the pan by the overhanging baking paper and slice into 12 generous portions.
Enjoy the indulgent blend of chocolate, cream, and that iconic red velvet charm — it’s a no-bake masterpiece that’s bound to wow your guests every time!
Top Tip
These tips come from hands-on experience with this Red Velvet Cheesecake Recipe, helping you avoid common pitfalls and ensure your dessert looks as amazing as it tastes.
- Perfect Crust: Crushing the Oreo cookies finely and firmly pressing them into the pan makes all the difference for a sturdy base that won’t crumble when slicing.
- Gelatine Blooming: Don’t rush the gelatine – blooming it for a full 5 minutes in water before gently warming helps the cheesecake set beautifully without lumps.
- Folding Technique: Gently folding the whipped cream into the cream cheese mix keeps the filling light and airy, which matches the smooth richness of red velvet perfectly.
- Chilling Patience: Allowing at least 6 hours (or ideally overnight) to chill is key – skipping this can result in a softer, less set cheesecake that’s tricky to slice cleanly.
How to Serve Red Velvet Cheesecake Recipe

Garnishes
For a show-stopping finish, sprinkle shaved or grated dark chocolate atop the whipped cream layer. The rich chocolate curls add elegance and a subtle texture contrast. Fresh berries like raspberries or strawberries also complement the cheesecake’s creamy chocolatey flavor and add a pop of freshness.
Side Dishes
This dessert pairs beautifully with a simple mixed berry compote or a dollop of crème fraîche to balance the sweetness. For drinks, a rich espresso or a glass of dessert wine brings out the luxurious chocolate notes in the cheesecake.
Make Ahead and Storage
Storing Leftovers
Keep your Red Velvet Cheesecake refrigerated in an airtight container or covered tightly with plastic wrap to prevent it from absorbing fridge odors. It will stay fresh and creamy for up to 3 days—perfect for enjoying slices without rush!
Freezing
If you’d like to freeze leftovers, wrap the cheesecake securely in cling film and then in foil to avoid freezer burn. Freeze for up to one month. When ready to serve, thaw overnight in the refrigerator to keep its creamy texture intact.
Reheating
This no-bake cheesecake is best enjoyed chilled and does not require reheating. Serving it cold maintains the smooth, velvety texture that makes this dessert so special.
Frequently Asked Questions:
Yes! While Oreo cookies provide a rich chocolate crunch, graham cracker crumbs or digestive biscuits are great alternatives that will offer a more classic, slightly lighter base.
Blooming gelatin in cold water softens it properly so it dissolves evenly in the filling. Skipping this step can lead to clumps or an improperly set cheesecake, especially since this is a no-bake recipe.
Use the specified 6 teaspoons of red food coloring for bold color without impacting flavor. Be sure to use a high-quality gel or liquid color, especially if you’re in the UK, as noted in the recipe.
Absolutely! This cheesecake keeps well in the fridge for up to 3 days. Making it a day ahead gives ample chilling time for perfect firmness and flavor.
Final Thoughts
This Red Velvet Cheesecake Recipe is a true crowd-pleaser — stunning in looks with its vivid color and deeply satisfying in flavor. It’s a wonderful no-bake option to bring a touch of elegance and indulgence to any occasion, whether a casual family gathering or a special celebration. Give yourself plenty of chilling time, follow the tips above, and get ready to enjoy a dessert that’s as delightful to serve as it is to eat!
Print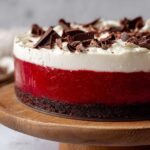
Red Velvet Cheesecake Recipe
- Prep Time: 30 minutes
- Chilling Time: 6 hours
- Cook Time: 0 minutes
- Total Time: 6 hours 30 minutes
- Yield: 12 servings
- Category: Dessert
- Method: No-Cook
- Cuisine: American
- Diet: Vegetarian
Description
This red velvet cheesecake is a no-bake dessert masterpiece combining the bold, vibrant color of red velvet cake with the creamy richness of cheesecake. Featuring a chocolatey, velvety smooth filling atop a crunchy Oreo cookie base, it's perfect for impressing guests with its striking appearance and delicious flavor.
Ingredients
Base
- 200 g Oreo cookies (1.5 standard packs)
- 60 g unsalted butter, melted
Gelatin Mixture
- 2 teaspoon unflavoured gelatine powder
- 2 tablespoon water
Cheesecake Filling
- 1 cup heavy/thickened cream, cold from fridge
- 500 g cream cheese, softened (block form)
- ¾ cup caster sugar (superfine sugar)
- 1 teaspoon vanilla extract
- 150 g 70% dark chocolate
- 6 teaspoon red food colouring
Whipped Cream Topping
- 1 ¼ cups heavy/thickened cream, cold from fridge
- 3 tablespoon caster sugar (superfine sugar)
- 1 teaspoon vanilla extract
Optional Garnish
- 2 tablespoon shaved or grated dark chocolate
Instructions
- Prepare Pan: Invert the base of a 20 cm (8 inch) springform pan so it’s upside down to ease cheesecake removal. Lightly butter the base and press a square sheet of baking paper onto it. Attach the pan sides, allowing excess baking paper to stick out for easy removal. Butter and line the pan sides with baking paper as well.
- Make Crust: Crush Oreo cookies finely and combine with melted butter. Press the mixture firmly and evenly into the prepared pan base. Chill in the refrigerator while preparing the filling.
- Bloom Gelatine: Sprinkle gelatine powder over 2 tablespoons of water and let it sit for 5 minutes to bloom.
- Melt Chocolate: Gently melt the 150 g dark chocolate using a double boiler or microwave in short bursts, stirring until smooth. Set aside to cool slightly.
- Whip Cream for Filling: Using an electric mixer, whip 1 cup cold heavy cream until stiff peaks form. Set aside.
- Make Cheesecake Mixture: Beat softened cream cheese with caster sugar and vanilla extract until smooth and creamy. Slowly add melted chocolate and red food coloring, mixing until fully combined.
- Add Gelatine: Warm the bloomed gelatine gently until liquid (do not boil), then quickly fold it into the cream cheese mixture.
- Combine with Whipped Cream: Gently fold the whipped cream into the cream cheese and gelatine mixture in batches, ensuring an even and airy texture.
- Assemble Cheesecake: Pour the filling mixture over the chilled Oreo crust in the prepared pan. Smooth the top with a spatula.
- Chill to Set: Refrigerate the cheesecake for at least 6 hours or overnight until firm and set.
- Prepare Whipped Cream Topping: Whip 1 ¼ cups cold heavy cream with caster sugar and vanilla extract until soft to medium peaks form.
- Top and Garnish: Spread or pipe the whipped cream evenly over the set cheesecake. Optionally, sprinkle grated or shaved dark chocolate on top for garnish.
- Serve: Carefully release the cheesecake from the pan using the excess baking paper, slice into 12 portions, and serve chilled. Enjoy the indulgent red velvet cheesecake!
Notes
- This is a no-bake cheesecake, perfect for summer or when you want to skip turning on the oven.
- Use full-fat cream cheese and heavy cream for best texture and flavor.
- UK readers, the red food coloring measurement is optimized accordingly; adjust if using other brands.
- For a firmer cream topping, you can add a stabilizer like gelatin or cream of tartar.
- Allow plenty of chilling time to ensure the cheesecake sets properly and holds its shape.
- The Oreo base provides a crunchy contrast to the smooth filling; you may substitute with graham cracker crumbs if preferred.
- Store leftovers covered in the refrigerator for up to 3 days.
Nutrition
- Serving Size: 1 serving
- Calories: 540 kcal
- Sugar: 29 g
- Sodium: 210 mg
- Fat: 43 g
- Saturated Fat: 25 g
- Unsaturated Fat: 14 g
- Trans Fat: 0.2 g
- Carbohydrates: 37 g
- Fiber: 2 g
- Protein: 6 g
- Cholesterol: 103 mg


Leave a Reply