This Honey Garlic Chicken Wings Recipe is the perfect blend of sweet, savory, and just a little bit of heat — seriously, once you try this, it’ll be your go-to for wing night. I love how crispy the wings get while the sticky honey garlic sauce clings to every bite. Let me walk you through making this crowd-pleaser.

Jump to:
Why You'll Love This Recipe
This Honey Garlic Chicken Wings Recipe has become a staple in my kitchen because it’s so straightforward and delivers big on flavor every time. Whether it’s game day, a casual dinner, or a party appetizer, these wings impress without stress.
- Perfect balance of flavors: The sweetness of honey pairs beautifully with sharp garlic and a hint of spice from red pepper flakes.
- Simple ingredients, big impact: You probably already have everything in your pantry, which means no last-minute grocery runs.
- Crisp yet tender wings: The technique of browning before baking keeps the skin perfectly crispy without drying out the meat.
- Flexible for your style: You can easily adjust heat levels or swap sauces for customizing your version.
Ingredients & Why They Work
What makes this Honey Garlic Chicken Wings Recipe shine is how simple, quality ingredients come together seamlessly. Each component plays a key role in creating that irresistible sticky-sweet-and-savory coating that clings to crispy chicken.

- Chicken wings: Using drumettes and wingettes gives you a perfect bite-sized shape, and patting them dry helps crisp up the skin.
- Salt and pepper: Classic, essential seasoning to bring out the natural flavors of the chicken.
- Olive oil: Helps brown the wings nicely and keeps them from sticking to the skillet.
- Honey: The star of the sauce, providing sweetness and that glossy finish.
- Garlic: Fresh minced garlic lends the punch of aroma and depth everyone loves in a honey garlic combo.
- Coconut aminos: A great soy sauce alternative that adds umami without overpowering the sweetness.
- Apple cider vinegar: Brightens the sauce with a subtle tang to balance honey’s sweetness.
- Red pepper flakes: Optional but highly recommended — they introduce a nice kick that keeps things interesting.
- Arrowroot powder: This thickens the sauce perfectly without cloudiness or starchiness, giving that luscious glaze texture.
- Water: Used with arrowroot powder to form a slurry that smooths into the sauce.
Make It Your Way
I like to play around with the heat level here—sometimes I add extra red pepper flakes or even a dash of sriracha for a fiery twist. You can also swap coconut aminos for traditional soy sauce if you don’t need a gluten-free version. The great thing? This recipe is forgiving enough to handle your tweaks without losing that signature sticky, garlicky magic.
- Variation: One time I tried adding grated ginger into the sauce for a zingy freshness—delicious and unexpected! You’ll enjoy experimenting with what suits your taste.
- Gluten-free adaptation: Using coconut aminos keeps it gluten-free, making this recipe accessible to many diets.
- Heat adjustment: Omit or add more red pepper flakes depending on your spice tolerance.
Step-by-Step: How I Make Honey Garlic Chicken Wings Recipe

Step 1: Prepping those wings for max crisp
Your first job is making sure the wings are dry—this is key to getting crispy skin. If they come whole, cut them at the joints to separate the drumettes and wingettes, then discard the tips unless you love snacking on those crunchy bits. Dry them thoroughly with paper towels and season generously with salt and pepper. Trust me, don’t skip the drying—that crisp makes all the difference!
Step 2: Browning the wings in olive oil
Heat a tablespoon of olive oil over medium heat in an oven-safe skillet. Add the wings in a single layer and brown them evenly on all sides. This usually takes about 10 minutes. The browning step adds irresistible flavor and starts the crisping process before baking. Keep an eye on them so they don’t burn—medium heat is best for steady browning.
Step 3: Mixing and coating with the honey garlic sauce
While the wings brown, whisk together your honey, minced garlic, coconut aminos, apple cider vinegar, and red pepper flakes in a bowl. Pour this liquid gold over the browned wings and gently toss to coat. At this point, the sauce will look runny, but don’t worry—it thickens beautifully in the oven.
Step 4: Baking to sticky perfection
Pop the whole skillet into your preheated 400°F oven. Bake for 15 minutes, then take it out and toss the wings to redistribute the sauce. Back into the oven for another 5 minutes until wings are cooked through and the sauce is bubbling. This two-step baking helps the sauce reduce and cling to the wings without burning.
Step 5: Thickening the sauce and coating again
Remove the wings temporarily and place the skillet back on medium-high heat on your stove. Bring the sauce to a boil, then whisk in the arrowroot and water slurry slowly. Keep whisking until it thickens into a glossy glaze. Toss the wings back in to coat every piece in that shiny, sticky goodness.
Step 6: Serve and enjoy!
Serve immediately, maybe with a sprinkle of extra red pepper flakes for the heat lovers. I promise you’ll get all kinds of compliments.
Top Tip
Over the years I’ve learned a few tricks that really make this Honey Garlic Chicken Wings Recipe stand out. These small details will help you nail the texture and flavor every time, even if you’ve never made wings before.
- Dry those wings well: Moisture is the enemy of crispiness, so use paper towels thoroughly before seasoning.
- Don’t rush the browning: Give wings enough time on each side in the skillet to develop a golden crust before baking.
- Mix sauce while wings cook: This multi-tasking step saves time and keeps your workflow smooth.
- Use an oven-safe skillet: Saves dirty dishes and allows seamless transition from stovetop to oven.
How to Serve Honey Garlic Chicken Wings Recipe

Garnishes
I like to finish these wings with a sprinkle of red pepper flakes for a pop of color and extra kick. A few chopped green onions or some fresh parsley add a nice freshness and brighten up the plate beautifully. Sometimes I even toss in a handful of toasted sesame seeds just for a little nutty crunch.
Side Dishes
Classic pairings like crunchy celery sticks and carrot batons with ranch or blue cheese dressing always work. For a fuller meal, I often serve these wings alongside garlic fried rice or a simple slaw to cut through the sweetness. Roasted veggies or a crisp green salad balance things out too.
Creative Ways to Present
For parties, I’ve served these wings on a wooden board lined with parchment, surrounded by little bowls of dips and garnishes—a perfect finger food setup. Another fun idea: skewer the wings with pineapple chunks for a sweet-savory skewer that’s a total crowd-pleaser.
Make Ahead and Storage
Storing Leftovers
If you have leftovers (which is rare in my house), store them in an airtight container in the fridge for up to 3 days. The wings soften a bit overnight, so I recommend reheating to bring back some of that crisp.
Freezing
These wings freeze well! Freeze them in a single layer on a baking sheet first, then transfer to freezer bags. Defrost overnight in the fridge and reheat to enjoy later. Just note the sauce might separate slightly but a quick reheat with stirring fixes that.
Reheating
I reheat leftovers in a hot skillet or under the broiler for a few minutes to return the crispiness while warming the sauce thoroughly. Microwaving works for convenience but softens the skin, so use if you’re in a pinch.
Frequently Asked Questions:
Absolutely, but make sure to thaw them completely and dry thoroughly before you start cooking. This will help you get that perfect crispy skin.
Coconut aminos are a soy-free and lower-sodium alternative to soy sauce with a similar umami flavor. It’s great if you want gluten-free or Paleo-friendly options. If you don’t have coconut aminos, regular soy sauce works fine too.
You can add more red pepper flakes, chili powder, or even a splash of hot sauce into the honey garlic sauce. Toasting some fresh chili or adding cayenne pepper can also elevate the heat without overpowering the honey’s sweetness.
Yes, you can bake wings directly, but browning them first helps develop flavor and crisp skin. If you prefer baking only, try broiling at the end for a few minutes to crisp up the skin.
Final Thoughts
This Honey Garlic Chicken Wings Recipe is a favorite in my house because it’s effortless but feels special every time. If you’re looking for a recipe that packs big flavor without fuss, trust me, you’re going to want to keep this one handy. Cooking these wings reminds me of casual get-togethers and sharing good food with people I love — and that’s the best part. Give it a try and watch these wings disappear faster than you can say 'pass the napkins!'
Print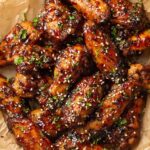
Honey Garlic Chicken Wings Recipe
- Prep Time: 10 minutes
- Cook Time: 25 minutes
- Total Time: 35 minutes
- Yield: 24 wings
- Category: Appetizer
- Method: Baking
- Cuisine: American
- Diet: Gluten Free
Description
These Honey Garlic Wings are a perfect blend of sweet and savory, with a sticky honey garlic sauce that coats crispy oven-baked chicken wings. Easy to prepare and packed with flavor, they make a fantastic appetizer or main dish for gatherings and weeknight dinners.
Ingredients
Chicken Wings
- 3 lbs. chicken wings (drums and wingettes) – approximately 12 wings and 12 drums
- Salt and pepper, to taste
- 1 Tbsp. olive oil
Honey Garlic Sauce
- ½ cup honey (153g)
- 6 cloves garlic, minced
- 2 Tbsp. coconut aminos (30g)
- 1 Tbsp. apple cider vinegar
- ½ tsp. red pepper flakes (optional, but recommended)
- ¼ Tbsp. arrowroot powder
- 1 Tbsp. water
Instructions
- Preheat oven: Preheat your oven to 400 degrees Fahrenheit to prepare for baking the wings.
- Prepare chicken wings: If your wings are not already separated, pat them dry with paper towels. Locate the joint between the drumette and wingette portions, and use a sharp knife to separate them, discarding the tips.
- Season wings: Pat the chicken wings dry again and season them generously with salt and pepper on all sides.
- Brown the chicken: Heat olive oil in a large oven-safe skillet or frying pan over medium heat. Add the wings and cook, turning occasionally, until browned on all sides, about 10 minutes.
- Mix the sauce: While the wings are cooking, combine honey, minced garlic, coconut aminos, apple cider vinegar, and red pepper flakes (if using) in a bowl. Stir until well mixed.
- Coat wings with sauce: Once wings are browned, pour the honey garlic sauce over them in the skillet. Toss to coat evenly. The sauce will be thin initially but will thicken during baking.
- Bake the chicken: Transfer the skillet to the preheated oven and bake for 15 minutes. Remove from oven, toss the wings again to mix the sauce, then return to bake an additional 5 minutes until wings are fully cooked and sauce is bubbling.
- Thicken the sauce: Remove skillet from oven and set the wings aside. Place the skillet with remaining sauce over medium-high heat on the stovetop. Bring to a boil, then whisk in the arrowroot powder mixed with water to thicken the sauce while stirring continuously.
- Coat the wings with thickened sauce: Return the baked wings to the skillet and toss thoroughly to coat with the thickened sauce. Remove wings and drizzle any extra sauce over them.
- Serve & enjoy: Serve the wings hot with additional red pepper flakes if desired. They pair well with celery, carrot sticks, and blue cheese or ranch dressing.
Notes
- Nutrition information is an estimate and may vary with substitutions or changes in portion size.
- Whole chicken wings can be used and cut into drums and wingettes as directed.
- The red pepper flakes add a nice heat, but you can omit them for a milder flavor.
- For a classic appetizer, serve with celery, carrot sticks, and blue cheese or ranch dressing.
Nutrition
- Serving Size: 1 wing
- Calories: 98 kcal
- Sugar: 4 g
- Sodium: 140 mg
- Fat: 6 g
- Saturated Fat: 2 g
- Unsaturated Fat: 4 g
- Trans Fat: 0 g
- Carbohydrates: 5 g
- Fiber: 0 g
- Protein: 7 g
- Cholesterol: 26 mg


Leave a Reply