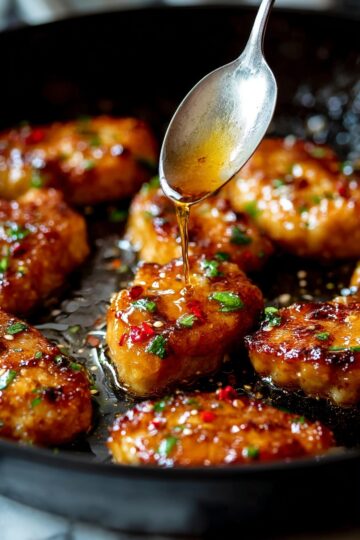
If you love that perfect mix of crispy, spicy, and savory, you're going to adore this Crispy Salt and Chilli Chicken Recipe. Trust me, once you try this Chinese-inspired dish, it’ll quickly become a favorite in your kitchen rotation.

Jump to:
Why You'll Love This Recipe
This salt and chilli chicken has a special place in my heart (and on my taste buds). The way the crunchy coating meets the bold, aromatic spices just feels like a little celebration in every bite.
- Crispy Perfection: The cornflour coating and frying technique guarantee an irresistibly crunchy texture every time.
- Flavor-Packed: The combination of Chinese 5 spice, white pepper, garlic, and chillies brings authentic Chinese flavors straight to your table.
- Quick and Convenient: From marinating to serving, this dish is ready in just 45 minutes, perfect for busy weeknights.
- Versatile Serving: Enjoy it as an appetizer or pair it with steamed rice for a satisfying main course.
Ingredients & Why They Work
When it comes to the ingredients, fresh is definitely best, especially for the chicken and veggies. Keep an eye out for good-quality boneless skinless chicken thighs—they’re juicier and more forgiving to cook than breasts.

- Boneless skinless chicken thighs: These stay juicy and tender even after deep frying, making for a more flavorful bite.
- Chinese 5 Spice: Adds that signature sweet and warm aroma that’s fundamental to this dish’s flavor profile.
- White pepper: Gives a gentle heat and subtle earthiness without overpowering the other spices.
- Fine/table salt: Balances flavors and enhances the natural taste of the chicken and vegetables.
- Sesame oil: A nutty aroma that penetrates the marinade, adding depth.
- Garlic (paste and diced): Fresh garlic is a must for that punch of savory goodness.
- Cornflour/cornstarch: The secret to the crispy coating that won’t turn soggy.
- Egg: Helps bind the coating to the chicken so it crisps up beautifully.
- Vegetable oil: Choose a neutral oil with a high smoke point perfect for deep frying.
- White onion: Adds sweetness and body to the stir-fry.
- Red and green peppers: For color, crunch, and a mild fruity note.
- Red birds eye chillies: These pack a punch—adjust the quantity based on your heat tolerance.
- Spring onions: Fresh, sharp, and vibrant garnish to finish off the dish.
- Flaky sea salt: Provides delicate bursts of saltiness that contrast wonderfully with the chillies.
Make It Your Way
The beauty of this Crispy Salt and Chilli Chicken Recipe is its versatility—feel free to adjust the heat level or add your favorite veggies to make it truly yours. Whether you like it fiery hot or just a gentle kick, this dish is all about balancing crispy, spicy, and savory flavors.
- Variation: If you prefer a milder version, try reducing the birds eye chillies to one or removing the seeds altogether. I’ve made this for friends who can’t handle too much spice, and it still tastes incredible—just with a gentler warmth.
- Gluten-Free Option: Use gluten-free cornflour and soy sauce alternatives to make this recipe safe for gluten-sensitive eaters. The texture stays just as crispy and satisfying!
- Seasonal Twist: Swap in seasonal vegetables like julienned carrots, snow peas, or baby corn in place of or alongside the peppers to keep it fresh and colorful year-round.
Step-by-Step: How I Make Crispy Salt and Chilli Chicken Recipe

Step 1: Marinate with Love
Start by combining 600g of diced boneless skinless chicken thighs with 2 teaspoons of fragrant sesame oil, 2 cloves of garlic finely grated into a paste, 1 teaspoon each of Chinese 5 Spice, fine salt, and white pepper in a bowl. Mix everything thoroughly to ensure each piece is well coated. Let the chicken marinate for a full 30 minutes—this gives the flavors time to soak in and really infuse the meat with that signature kick.
Step 2: Coat the Chicken for Crunch
Pour 160g of cornflour into a large shallow dish. Reserve about 2 ½ tablespoons and mix it directly into the marinated chicken by hand. This will make the chicken sticky and set the stage for a crunchy coating. Let this mixture rest for a few minutes for the cornflour to soak in properly.
Step 3: Egg Wash and Final Coating
Next, mix 1 beaten medium egg into the chicken and cornflour mixture until fully combined. Now comes the slightly tedious but essential part: take each piece of chicken and coat it thoroughly with the remaining cornflour, pressing it into every nook and cranny to create flaky little crispy bits. Shake off any excess and arrange the coated chicken on a baking tray. Don’t hesitate to add more cornflour if you start running low—this step is key for that coveted crunch.
Step 4: Prepare Your Oil and Fry
Pour enough vegetable oil into a heavy-based or cast-iron pan to cover about ¾ inch depth—roughly enough to cover a bit more than half the thickness of the chicken pieces. Heat the oil over medium-high heat until it reaches 190°C (375°F). Staying patient here is important: oil that’s too cool will result in greasy chicken, while oil that’s too hot will burn the coating.
Step 5: Fry in Batches Until Golden
Fry the chicken in 2 to 3 batches to avoid overcrowding and uneven cooking. Cook each batch for about 3 minutes on each side until the chicken is golden brown, crispy, and cooked through. Use a wire rack set over kitchen paper to drain excess oil once removed. Be sure to reheat the oil back to 190°C between batches for consistent results.
Step 6: Stir-fry the Veggies with a Kick
Using 2 tablespoons of the leftover frying oil, heat a wok or deep pan over high flame. Toss in the thinly sliced white onion, half a red and half a green pepper, 2 cloves of diced garlic, and 2 thinly sliced red birds eye chillies. Stir-fry everything for 2 to 3 minutes until the vegetables soften but still retain a bit of crunch—this adds a wonderfully fresh contrast to the crispy chicken.
Step 7: Bring It All Together
Add the fried chicken pieces back into the wok along with 2 sliced spring onions, ½ teaspoon flaky sea salt, ¼ teaspoon Chinese 5 Spice, and ⅛ teaspoon white pepper. Toss everything well to evenly coat the chicken and veggies with those gorgeous spices and seasonings. Heat through thoroughly.
Step 8: Serve Crisp and Hot
Transfer your crispy, spicy salt and chilli chicken to a serving plate and enjoy immediately. It’s best served hot, paired beautifully with steamed rice or as a standout snack alongside a cold beverage. Each bite delivers that perfect combination of texture and heat that keeps you coming back for more.
Top Tip
These tips come straight from experience to help you nail the perfect Crispy Salt and Chilli Chicken every time — because achieving that crunchy, spicy magic can be a bit tricky at first!
- Oil Temperature Control: I’ve found that heating your oil to exactly 190°C (375°F) is crucial. If it’s too cool, your chicken soaks up oil and gets soggy; too hot, and the coating burns before the inside cooks.
- Coating Technique: Pressing the cornflour firmly into the chicken pieces ensures that delightful flaky crust. It feels tedious, but it’s absolutely worth it — I learned this after a few sad batches of limp coating.
- Batch Frying: Fry the chicken in small batches. Overcrowding the pan drops the oil temperature quickly, causing greasy, less crispy chicken. Give your pieces plenty of space and reheat the oil between batches.
- Chilli Heat Balance: The birds eye chillies pack a punch! I often remove some seeds or reduce the quantity slightly to suit my family’s spice tolerance without losing flavor.
How to Serve Crispy Salt and Chilli Chicken Recipe

Garnishes
Fresh spring onions and extra sliced red chillies bring a lovely pop of color and heat on top. A sprinkle of toasted sesame seeds adds a nutty crunch that pairs beautifully with the crispy chicken. Don’t forget a few lemon or lime wedges on the side — a quick squeeze brightens up every bite!
Side Dishes
This dish shines when served alongside simple steamed jasmine or basmati rice, which soaks up all those aromatic, spicy juices. You can also offer it with stir-fried greens like bok choy or Chinese broccoli for some fresh, crunchy contrast. For a snack-style twist, serve the chicken with a cold beer or an ice-cold soda.
Make Ahead and Storage
Storing Leftovers
Once completely cooled, place any leftover Crispy Salt and Chilli Chicken in an airtight container and store it in the fridge. It’ll keep well for up to 2 days, though it’s definitely best enjoyed fresh and crispy.
Freezing
If you want to freeze leftovers, flash cool the chicken first on a wire rack, then freeze in a single layer on a baking tray before transferring to a freezer bag or container. Frozen chicken is best eaten within 1 month for optimal taste and texture.
Reheating
To bring back that signature crispiness, reheat the chicken in a preheated oven at 190°C (375°F) for about 8–10 minutes. Avoid microwaving as it makes the coating soggy. For extra crispness, place the chicken on a wire rack over a baking tray so hot air circulates all around.
Frequently Asked Questions:
Yes, you can substitute boneless chicken breast, but thighs tend to stay juicier and more tender when fried. If using breast, be careful not to overcook as it can dry out faster.
This recipe has a noticeable but manageable kick thanks to the birds eye chillies. You can adjust the spice level by reducing the chillies or removing their seeds before cooking.
Maintaining oil at 190°C (375°F) ensures the coating crisps quickly without soaking up too much oil, resulting in that perfect crunchy texture and juicy chicken inside.
Baking won’t give quite the same crispy, flaky coating as deep frying does. For the authentic texture and flavor, frying is recommended. However, baking at high heat with a light spray of oil could be an alternative if you want a healthier option.
Final Thoughts
There’s something so comforting about biting into crispy, spicy Salt and Chilli Chicken fresh from the wok. It’s a dish that excites the senses — with its crunch, spice, and savory notes all coming together beautifully. I hope these tips and insights help you bring this Chinese-inspired favorite to life in your own kitchen. Happy cooking, and don’t forget to enjoy it hot!
Print
Crispy Salt and Chilli Chicken Recipe
- Prep Time: 30 minutes
- Marinating Time: 30 minutes
- Cook Time: 15 minutes
- Total Time: 45 minutes
- Yield: 4 servings
- Category: Main Course
- Method: Frying
- Cuisine: Chinese
Description
Salt and Chilli Chicken is a flavorful and crispy Chinese-inspired dish featuring marinated chicken thighs coated in cornflour and deep-fried to perfection, then stir-fried with garlic, peppers, and chillies for a spicy kick. This recipe offers a perfect balance of crispy texture and aromatic spices, delivering an irresistible appetizer or main course.
Ingredients
Chicken and Marinade
- 600 g boneless skinless chicken thighs
- 1 teaspoon Chinese 5 Spice
- 1 teaspoon white pepper
- 1 teaspoon fine/table salt
- 2 teaspoon sesame oil
- 2 cloves garlic, finely grated into a paste
Coating and Frying
- 160 g cornflour/cornstarch (plus more if needed)
- 1 medium egg, beaten
- 360 ml vegetable oil (or as needed for frying)
Stir-fry Vegetables and Seasoning
- 1 small/medium white onion, thinly sliced
- ½ red pepper, thinly sliced
- ½ green pepper, thinly sliced
- 2 cloves garlic, finely diced
- 2 red birds eye chillies, thinly sliced
- 2 spring onions, thinly sliced
- ½ teaspoon flaky sea salt
- ¼ teaspoon Chinese 5 Spice
- ⅛ teaspoon white pepper
Instructions
- Marinate the Chicken: In a medium-sized mixing bowl, combine the diced chicken with sesame oil, grated garlic paste, Chinese 5 spice, salt, and white pepper. Mix well and leave to marinate for 30 minutes to absorb all the flavors.
- Coat the Chicken: Add the cornflour to a large shallow dish. Take 2 ½ tablespoons of the cornflour and mix it into the marinated chicken using your hands until evenly combined. Let it sit for a few minutes so the cornflour soaks in and the mixture becomes sticky.
- Add Egg and Final Coating: Mix the beaten egg into the chicken mixture until fully incorporated. Then, one piece at a time, thoroughly coat each piece with cornflour, pressing it into every crevice to create a flaky, crispy texture. Place the coated chicken pieces on a baking tray. Add more cornflour if needed during this process.
- Heat Oil for Frying: Pour around ¾ inch of vegetable oil into a heavy-based or cast-iron pan, enough to cover just over half the thickness of the chicken pieces. Heat the oil over medium-high heat until it reaches 190°C (375°F).
- Deep Fry the Chicken: Working in 2-3 batches, fry the chicken pieces in the hot oil until golden brown and crisp on the outside and cooked through inside, about 3 minutes per side. Remove and drain the chicken on a wire rack set over kitchen paper to catch excess oil. Reheat the oil to temperature between batches.
- Stir-fry Vegetables: In a wok or deep pan, add 2 tablespoons of the leftover frying oil and heat over high heat. Add the sliced onion, red and green peppers, diced garlic, and sliced red chillies. Stir-fry for 2-3 minutes until the vegetables soften slightly.
- Combine and Season: Add the fried chicken, sliced spring onions, flaky sea salt, Chinese 5 spice, and white pepper to the wok. Toss everything together to evenly distribute the seasoning and heat thoroughly.
- Serve Immediately: Transfer to a serving plate and enjoy while hot for the best crispy, spicy experience.
Notes
- Birds eye chillies add significant heat; adjust the quantity or remove seeds to control spiciness.
- Ensure the oil is hot enough before frying to maintain crispiness and prevent the chicken from absorbing excess oil.
- Use a heavy-based pan or cast-iron skillet for even heat distribution during frying.
- Coating the chicken thoroughly with cornflour and egg is key to achieve a crunchy texture.
- Serve with steamed rice or as a snack accompaniment with a cold beverage.
Nutrition
- Serving Size: 1 serving
- Calories: 486 kcal
- Sugar: 3.87 g
- Sodium: 895 mg
- Fat: 18.84 g
- Saturated Fat: 9.747 g
- Unsaturated Fat: 7.415 g
- Trans Fat: 0.034 g
- Carbohydrates: 45.04 g
- Fiber: 2.2 g
- Protein: 32.44 g
- Cholesterol: 182 mg


Leave a Reply