If you’re craving a sweet treat that’s nutty, crunchy, and chocolatey all at once, you’ve got to try this Butterfinger Peanut Butter Balls Recipe. These no-bake delights come together quickly and deliver that perfect combo of creamy peanut butter and crispy Butterfinger crunch with a luscious chocolate coating.

Jump to:
Why You'll Love This Recipe
I honestly can’t get enough of these Butterfinger peanut butter balls—they're like the perfect little bites of comfort that you can whip up in no time. Every time I make a batch, they disappear almost instantly at family gatherings or just as an everyday indulgence.
- Super Easy and No-Bake: No oven needed, so you can make these even on a busy day or holiday prep.
- Crunch Meets Cream: The crushed Butterfinger bars add a delightful crunch that pairs perfectly with creamy peanut butter.
- Customizable Coating: Dip fully or halfway in chocolate, then finish with sprinkles, sea salt, or extra crushed Butterfingers.
- Make-Ahead Friendly: Freeze them for later and enjoy a quick, festive snack whenever the mood strikes.
Ingredients & Why They Work
Before we get rolling, let’s chat ingredients. To get that perfect texture and flavor, it’s key to pick the right types of peanut butter and chocolate. Also, using crushed Butterfingers fresh ensures that crispy crunch we love.

- Butter: Softened so it blends smoothly with the peanut butter, adding richness and helping the balls hold together.
- Vanilla Extract: Just a splash to deepen the flavor and add warmth.
- Peanut Butter: Use a regular commercial brand like Jif or Skippy since natural kinds tend to separate and can mess with the texture.
- Powdered Sugar: The sweetness binder that helps create that melt-in-your-mouth consistency.
- Graham Cracker Crumbs: For a subtle crunch and a hint of honey flavor to balance the peanut butter.
- Crushed Butterfinger Bars: The star ingredient that brings irresistible crunch and a bit of that signature Butterfinger candy bar flavor.
- Chocolate Bark or Chocolate Chips: Melts into a smooth coating that seals in all the goodness and adds that luscious chocolate finish.
- Optional Toppings: Extra crushed Butterfingers, festive sprinkles, or a sprinkle of coarse sea salt—perfect for adding flair and extra flavor.
Make It Your Way
The great thing about this Butterfinger Peanut Butter Balls Recipe is how easy it is to customize. Whether you want to amp up the chocolate, add a salty twist, or make them extra festive, these little bites are perfect for personalizing to your taste and occasion.
- Chocolate Lovers’ Twist: I love using a mix of dark and milk chocolate chips to coat half of the balls for a richer, slightly bittersweet contrast that complements the peanut butter perfectly.
- Seasonal Sparkle: Around the holidays, adding festive sprinkles on top right after dipping adds a cheerful crunch and makes these treats party-ready in an instant.
- Salty Sweet Combo: Sprinkling a pinch of coarse sea salt on the chocolate coating before it hardens balances the sweetness beautifully and gives an addictive edge to each bite.
- Nut-Free Variation: For friends with nut allergies, swap out the peanut butter for sunflower seed butter and skip the Butterfinger bars, replacing with crushed pretzels for a similar crunch and texture.
Step-by-Step: How I Make Butterfinger Peanut Butter Balls Recipe

Step 1: Cream Together the Peanut Butter and Butter
Start by softening 4 tablespoons of butter until it’s easy to mix, then combine it with 1 cup of regular peanut butter (like Jif or Skippy) in a large bowl. Using a hand or stand mixer, beat them together until you get a smooth, creamy texture. Add 1 teaspoon of vanilla extract next, giving it another good mix. The key is to get a silky base – this is what makes your Butterfinger Peanut Butter Balls Recipe so luscious and rich.
Step 2: Sweeten and Add the Crunch
Next, gradually add in 1 cup of powdered sugar on low speed. This helps keep your mixture from becoming overly dusty or powdery while evenly distributing the sweetness. Remember to scrape the sides of your bowl occasionally to keep everything mixed in. Then, fold in ¾ cup of graham cracker crumbs and ½ cup of crushed Butterfinger bars. The graham crumbs offer a subtle crunch and body, while the Butterfingers add that signature crisp, buttery candy crunch that makes this recipe shine.
Step 3: Shape and Chill the Balls
Line a baking sheet with parchment paper for easy cleanup, then scoop out about 1 to 1½ tablespoons of mixture per ball. Roll each scoop gently between your palms until you have smooth, round balls. Space them out nicely on the tray to prevent sticking. Pop the tray into the freezer and chill the balls for 30 minutes or until they're completely firm – this step is crucial so your balls don’t fall apart when dipping in chocolate.
Step 4: Melt the Chocolate with Care
While your peanut butter balls chill, prepare the coating. Use 8 ounces of chocolate bark or chocolate chips and place them in a microwave-safe bowl. Heat in 30-second intervals at 50% power, stirring gently between each burst. This careful melting prevents the chocolate from burning or seizing—stir until the chocolate is completely smooth and glossy. This is the final key for a beautiful, shiny coating on your Butterfinger Peanut Butter Balls Recipe.
Step 5: Dip, Decorate, and Set
Remove your chilled peanut butter balls from the freezer. Using a fork or dipping tool, dip each ball completely or halfway into the melted chocolate, letting any excess drip off. While the chocolate is still wet, sprinkle with extra crushed Butterfinger bars, festive sprinkles, or a pinch of coarse sea salt if desired. Place the coated balls back on the parchment-lined sheet and allow the chocolate to harden fully at room temperature before serving or storing. This sets the chocolate beautifully – no rush here!
Top Tip
Making Butterfinger Peanut Butter Balls Recipe is as much about technique as it is about ingredients. These tips will help you get that perfect balance of creamy, crunchy, and chocolaty every single time.
- Choose the Right Peanut Butter: I always use regular creamy peanut butter like Jif or Skippy because natural varieties tend to separate and can throw off the texture of the mixture.
- Perfect the Chill: Freezing the balls fully for at least 30 minutes is key. It makes dipping into melted chocolate much easier and prevents melting or misshapen balls.
- Gentle Chocolate Melting: Melting your chocolate at 50% power in short bursts keeps it smooth and shiny without burning – trust me, a little patience here makes a world of difference.
- Don’t Skip the Decorations: Adding extra crushed Butterfinger pieces or a sprinkle of sea salt right after dipping adds texture and elevates the flavor—this small flourish really impresses guests!
How to Serve Butterfinger Peanut Butter Balls Recipe

Garnishes
For an irresistible presentation, try topping your Butterfinger Peanut Butter Balls with a sprinkle of festive colored sprinkles or extra crushed Butterfinger pieces. A delicate dusting of coarse sea salt adds a delightful contrast to the sweetness. You can also drizzle some melted chocolate over the set coating for a classy, swirled effect.
Side Dishes
These little balls pair wonderfully with a cold glass of milk or a cup of robust coffee or tea. For festive gatherings, serve alongside other no-bake treats like chocolate-covered pretzels or mini fudge squares to create a varied dessert spread that will satisfy every sweet tooth.
Make Ahead and Storage
Storing Leftovers
Store your Butterfinger Peanut Butter Balls in an airtight container in the refrigerator. They’ll stay fresh and delicious for up to one week—great for keeping your sweet cravings at bay without any fuss.
Freezing
These balls freeze wonderfully! After they’re set and dipped in chocolate, place them in a single layer on a parchment-lined tray and freeze until firm. Then transfer to a freezer-safe container or zip-top bag. They’ll keep their flavor and texture for up to 3 months—perfect for holiday prep or surprise guests.
Reheating
No reheating necessary here! Serve them chilled or let them sit at room temperature for a few minutes if you prefer a softer texture. Just avoid warming them, as the chocolate coating can melt and the peanut butter center may get too soft.
Frequently Asked Questions:
It’s best to use regular creamy peanut butter like Jif or Skippy. Natural peanut butter tends to separate and can make the mixture less cohesive, affecting the texture of the balls.
When stored in an airtight container in the refrigerator, they stay fresh for up to one week. You can also freeze them for up to 3 months for longer storage.
Absolutely! Dark chocolate chips or bark work wonderfully if you prefer a richer, less sweet chocolate flavor. Just melt gently as directed.
Yes, freezing for about 30 minutes firms up the balls, making them easier to dip and helping the chocolate coating set cleanly without melting the peanut butter center.
Final Thoughts
There’s something truly comforting about biting into a Butterfinger Peanut Butter Balls Recipe — the creamy peanut butter, the satisfying crunch from Butterfinger bars, and that luscious chocolate coating all come together in a snap. Whether you’re looking for holiday treats or a sweet pick-me-up any time of year, these no-bake delights are an absolute must. I hope this recipe brings a smile to your face and a little extra joy to your kitchen!
Print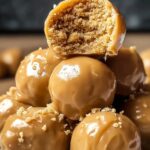
Butterfinger Peanut Butter Balls Recipe
- Prep Time: 20 minutes
- Freezing Time: 30 minutes
- Total Time: 50 minutes
- Yield: 24 balls
- Category: Dessert
- Method: No-Cook
- Cuisine: American
- Diet: Vegetarian
Description
Butterfinger Balls are a quick and easy no-bake treat combining creamy peanut butter, crunchy crushed Butterfinger bars, and a smooth chocolate coating. Perfect for holidays or anytime you crave a sweet, nutty delight.
Ingredients
Base
- 4 tablespoons butter softened
- 1 teaspoon vanilla extract
- 1 cup peanut butter (avoid all-natural varieties that separate)
Mix-ins
- 1 cup powdered sugar
- ¾ cup graham cracker crumbs
- ½ cup crushed Butterfinger bars
Coating and Toppings
- 8 ounces chocolate bark or chocolate chips for coating
- Optional: extra crushed Butterfinger bars
- Optional: festive sprinkles
- Optional: coarse sea salt for topping
Instructions
- Mix the Base: In a large bowl, use a hand or stand mixer to cream together the peanut butter and softened butter until smooth. Add vanilla extract and mix until combined.
- Add Sweetness and Crunch: Gradually mix in the powdered sugar at low speed, scraping the sides of the bowl as needed. Fold in graham cracker crumbs and crushed Butterfingers until the mixture is evenly combined.
- Form the Balls: Line a baking sheet with parchment paper. Scoop about 1 to 1½ tablespoons of the dough and roll into balls. Place them spaced apart on the sheet.
- Chill to Set: Freeze the formed balls for 30 minutes or until completely firm.
- Melt the Chocolate: In a microwave-safe bowl, melt the chocolate bark or chips in 30-second intervals at 50% power, stirring between bursts until smooth. Be careful not to overheat.
- Dip and Decorate: Dip each chilled ball in the melted chocolate—either fully or halfway. Immediately top with additional crushed Butterfingers, sea salt, or sprinkles before the chocolate sets.
- Let Them Set: Allow the chocolate coating to harden completely before serving or storing.
Notes
- Use regular peanut butter (like Jif or Skippy) for best consistency.
- For a deeper chocolate flavor, use dark chocolate chips or bark.
- These freeze beautifully—great for make-ahead treats during holidays or special occasions.
- Try dipping only halfway for a two-tone look or drizzle extra chocolate over the tops once set.
Nutrition
- Serving Size: 1 ball
- Calories: 110 kcal
- Sugar: 9 g
- Sodium: 50 mg
- Fat: 7 g
- Saturated Fat: 3.5 g
- Unsaturated Fat: 3 g
- Trans Fat: 0 g
- Carbohydrates: 9 g
- Fiber: 0.5 g
- Protein: 2 g
- Cholesterol: 10 mg


Leave a Reply